Posts in the Craftwerks category:

Drawing a Snow Blade in OpenSCAD

in Craftwerks by evan power
Tags: , ,

Over the holidays my friend Greg was talking about making some snow blades but he said he didn't know how to draw a 3D model of one. I figured I'd make some instructions for drawing a simple snow blade core in OpenSCAD. These instructions don't include any camber or rocker. I don't really know anything about ski design, so this example probably won't lead to a usable model, but it's a start.

Step 1: The Body of the Ski

We'll draw the tips and tails of the ski separately from the rest of the ski, which I'm going to call the body. We'll draw the body first. The body will start as a simple rectangle.

edgeLength = 100;
maxWidth = 15;
maxThickness = 2;

cube([edgeLength, maxWidth, maxThickness]);

Step 2: Centring the Ski

We'll centre the ski in the X and Y axes. This will make things a little easier later on.

edgeLength = 100;
maxWidth = 15;
maxThickness = 2;

translate([-edgeLength/2, -maxWidth/2, 0])
    cube([edgeLength, maxWidth, maxThickness]);

Step 3: Make the Body Into a Module

To keep thing neat we'll make a module that contains the ski body and call that module.

edgeLength = 100;
maxWidth = 15;
maxThickness = 2;

module body(length, maxWidth, maxThickness)
{
    translate([-length/2, -maxWidth/2, 0])
        cube([length, maxWidth, maxThickness]);
}

body(edgeLength, maxWidth, maxThickness);

Step 4: Make the Tip

Make the tip. Keep it simple and just make it a semicircle. We'll draw a full circle because it's simpler.

edgeLength = 100;
maxWidth = 15;
maxThickness = 2;

module body(length, maxWidth, maxThickness)
{
    translate([-length/2, -maxWidth/2, 0])
        cube([length, maxWidth, maxThickness]);
}

module tip(edgeLength, maxWidth, maxThickness)
{
    translate([edgeLength/2, 0, 0])
        cylinder(h=maxThickness, r=maxWidth/2);
}

body(edgeLength, maxWidth, maxThickness);
tip(edgeLength, maxWidth, maxThickness);

Step 5: Make the Tail

The tail is just like the tip.

edgeLength = 100;
maxWidth = 15;
maxThickness = 2;

module body(length, maxWidth, maxThickness)
{
    translate([-length/2, -maxWidth/2, 0])
    cube([length, maxWidth, maxThickness]);
}

module tip(edgeLength, maxWidth, maxThickness)
{
    translate([edgeLength/2, 0, 0])
    cylinder(h=maxThickness, r=maxWidth/2);
}

module tail(edgeLength, maxWidth, maxThickness)
{
    translate([-edgeLength/2, 0, 0])
    cylinder(h=maxThickness, r=maxWidth/2);
}

body(edgeLength, maxWidth, maxThickness);
tip(edgeLength, maxWidth, maxThickness);
tail(edgeLength, maxWidth, maxThickness);

Step 6: Make the Sidecut

This is where things get fun. We'll make the sidecuts circular for simplicity. They could be parabolic with a little change to this function. To make them we'll draw two cylinders and subtract them from the ski's shape. We need to find the part of the circle that is the width of the edge length. That will take a little trigonometry. When defining the cylinders we need to set the $fa parameter to 1 to make each segment of the cylinder one degree or less.

edgeLength = 100;
maxWidth = 15;
maxThickness = 2;
sidecutRadius = 600;

module body(length, maxWidth, maxThickness)
{
    translate([-length/2, -maxWidth/2, 0])
        cube([length, maxWidth, maxThickness]);
}

module tip(edgeLength, maxWidth, maxThickness)
{
    translate([edgeLength/2, 0, 0])
        cylinder(h=maxThickness, r=maxWidth/2);
}

module tail(edgeLength, maxWidth, maxThickness)
{
    translate([-edgeLength/2, 0, 0])
        cylinder(h=maxThickness, r=maxWidth/2);
}

module sidecut(radius, edgeLength, thickness, maxWidth)
{
    hypotenuse = radius;
    opposite = edgeLength/2;
    offset = sqrt(hypotenuse*hypotenuse - opposite*opposite) + maxWidth/2;
    translate([0, offset, 0])
        cylinder(h = thickness, r = radius, $fa = 1);
    translate([0, -offset, 0])
        cylinder(h = thickness, r = radius, $fa = 1);
}

difference()
{
    union()
    {
        body(edgeLength, maxWidth, maxThickness);
        tip(edgeLength, maxWidth, maxThickness);
        tail(edgeLength, maxWidth, maxThickness);
    }
    sidecut(sidecutRadius, edgeLength, maxThickness, maxWidth);
}

Step 7: Make the Thickness Profile

To make the thickness profile we'll make a series of cubes that vary in height. Polyhedrons would probably work better here, but let's keep things simple. I chose a cosine function for the width. I don't know if that makes sense, but we can use any function here. We'll use the intersection function to keep only the spaces where the profile intersects with the ski.

edgeLength = 100;
maxWidth = 15;
minThickness = 1;
maxThickness = 2;
sidecutRadius = 600;

tipLength = maxWidth/2;
tailLength = maxWidth/2;
totalLength = edgeLength + tipLength + tailLength;

module body(length, maxWidth, maxThickness)
{
    translate([-length/2, -maxWidth/2, 0])
        cube([length, maxWidth, maxThickness]);
}

module tip(edgeLength, maxWidth, maxThickness)
{
    translate([edgeLength/2, 0, 0])
        cylinder(h=maxThickness, r=maxWidth/2);
}

module tail(edgeLength, maxWidth, maxThickness)
{
    translate([-edgeLength/2, 0, 0])
        cylinder(h=maxThickness, r=maxWidth/2);
}

module sidecut(radius, edgeLength, thickness, maxWidth)
{
    hypotenuse = radius;
    opposite = edgeLength/2;
    offset = sqrt(hypotenuse*hypotenuse - opposite*opposite) + maxWidth/2;
    translate([0, offset, 0])
        cylinder(h = thickness, r = radius, $fa = 1);
    translate([0, -offset, 0])
        cylinder(h = thickness, r = radius, $fa = 1);
}

module zProfile(length, minThickness, maxThickness, width)
{
    segments = 100;
    increment = length/segments;

    for(x = [0 : segments])
    {
        thickness = minThickness + (maxThickness - minThickness)*cos(90*(x / segments));

        echo(90*x/segments, thickness);
        translate([x*((length/2)/segments), -(width/2), 0])
            cube([increment, width, thickness]);

        translate([-x*((length/2)/segments), -(width/2), 0])
            cube([increment, width, thickness]);
    }
}

intersection()
{
    difference()
    {
        union()
        {
            body(edgeLength, maxWidth, maxThickness);
            tip(edgeLength, maxWidth, maxThickness);
            tail(edgeLength, maxWidth, maxThickness);
        }
        sidecut(sidecutRadius, edgeLength, maxThickness, maxWidth);
    }
    zProfile(totalLength, minThickness, maxThickness, maxWidth);
}

Mountain Bike Map T-Shirt

in Craftwerks by evan power
Tags: , , , ,

shirt graphic
I decided to make this shirt after playing with an intriguing piece of software called OSMnx. OSMnx is a Python module that retrieves road and trail networks from Open Street Map, and can make high quality images of those networks.

I'm no graphic designer but I love t-shirts and I sometimes find myself thinking "The Ramones are great, and I like wearing their logo on my shirt, but what else am I enthusiastic about that can be easily put on a t-shirt?". I absolutely love the trails in Squamish, particularly Entrails and the trails that branch off of it. Many of Squamish's mountain bike trails are mapped in Open Street Map so with OSMnx it was easy and fun to put bike trails in a form that can be screen-printed onto a t-shirt.

To generate an image of the Squamish road and trial network I entered the following lines into a Python interactive interpreter:

import osmnx as ox  
g = ox.graph_from_place('Squamish, Canada', network_type='bike', simplify=False)  
gproj = ox.project_graph(g)  
gsimp = ox.simplify_graph(gproj)  
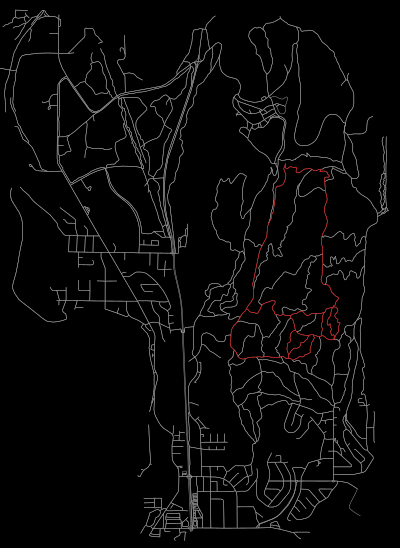
ox.plot_graph(gsimp, fig_height=30, node_size=0, edge_linewidth=0.5, save=True, file_format='svg', filename='squamishbike')

In my case this created a file called 'squamishbike.svg' in the 'images' folder in my home folder. The location of the output will vary depending on your operating system.

I used Inkscape (an excellent free and open source vector graphics editor) to crop the image and highlight a few permutations of my favorite Entrails loop; and I sent the resulting image off to a t-shirt printing company.

Thanks to all of the trail builders and maintainers, and code builders and maintainers, and Open Street Map contributors who made this project possible!